Easy Arepas OAMC Recipe for Busy Days
As a chef with a passion for both Brazilian and American cuisine, I love exploring and experimenting with various culinary traditions. Today, I am introducing you to a simple yet delicious recipe for WW 1 Point – Arepas. These golden corn cakes can be a great alternative to tortillas, and are perfect for those who are looking for a healthier alternative to their meals while also keeping it scrumptious.
Low in fat and packed with flavor, my arepas recipe is easy to make and can be stored for later consumption thanks to its OAMC (Once-A-Month-Cooking) nature. You’ll only need a handful of ingredients that are readily available in any well-stocked kitchen: olive oil, salt, warm water, and arepa flour.
In this article, I’ll take you step-by-step through the preparation process, offering tips and tricks along the way. Not only will you learn how to make delicious arepas in no time, but you will also be pleased to know that this recipe is only 1 point on WW scale! So let’s get started and discover just how mouth-watering healthy eating can be.
Why You’ll Love This Recipe

Are you bored with the same old tortillas or wraps for your meals? Then, you must give a try to these mouth-watering Arepas which are an amazing alternative to tortillas. What’s more? These Arepas are OAMC (Once A Month Cooking) recipe and they’ll only cost you 1 point if you follow Weight Watchers (WW) Program.
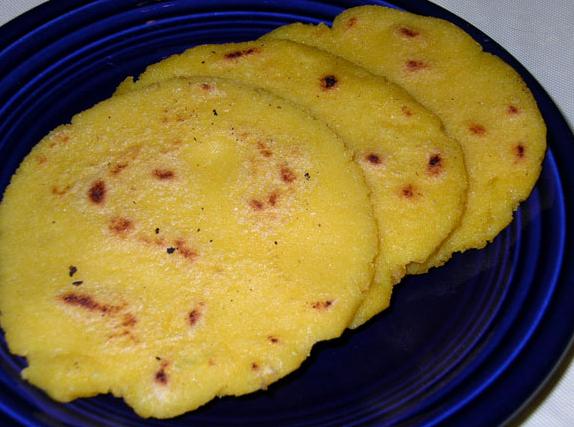
These are corn cakes that come from South America, specifically Colombian and Venezuelan cuisines. They are similar to corn tortillas but thicker, breadier, and fluffier. Unlike traditional tortillas, arepas have a crispy crust on the outside that is perfectly complemented by the soft and spongy inside texture. The best part? You don’t need any exotic ingredients to make them! All you need is some arepa flour, salt, warm water, and a little bit of olive oil.
If you’re feeling adventurous, you can even try making Arepas using shredded cauliflower instead of arepa flour. This will make it a healthier choice while still being absolutely delicious.
Not only are these Arepas easy to make, but they’re also a versatile option for every meal of the day. Whether it’s breakfast, lunch or dinner – Arepas are always a great option. Make a sandwich with them or pair them with your favorite stew or chili. You can even enjoy them as an afternoon snack when warmed and smeared with Nutella or peanut butter.
Trust me, once you try your hand at making these delicious Arepas, there’ll be no going back to boring old tortillas or wraps anymore!
Ingredient List
- 2 cups of arepa flour (alternatively, you can use corn flour or masa harina)
- 1 teaspoon of salt
- 1 tablespoon of olive oil
- 1 1/2 cups of warm water
Substitutions and Variations:
If you don’t have arepa flour on hand, corn flour or masa harina will work just fine. For a low-fat version, try making the arepas with warmed fat-free milk instead of water. You can also add shredded cheese to the dough for extra flavor. Queso fresco or mozzarella cheese work particularly well.
Additional ingredients to make variations:
- 1/4 cup of cauliflower rice
- 2 tortilla wraps
- 2 cups of pre-cooked quinoa
Using cauliflower rice instead of arepa flour is a great alternative for those who want to avoid carbs. Tortilla wraps can also be used as an alternative to make arepas pupusas gorditas or even corn cakes! Adding pre-cooked quinoa into the dough will give your arepas a protein boost.
The Recipe How-To

Step 1: Prepping the Dough
To make these ww 1 point arepas, you will need the following ingredients:
- 2 cups of arepa flour
- A pinch of salt
- 1 3/4 cups of warm water
- 1 tablespoon of olive oil
First, mix the arepa flour and the salt in a mixing bowl. Then, add the olive oil and warm water to the mixture slowly. Make sure the dough is not too dry or too wet; it should be soft but not sticky.
Step 2: Kneading the Dough
Knead the dough with your hands for around 5-7 minutes until it becomes smooth and elastic. If it’s too sticky, add more flour slowly until you get the right consistency.
Step 3: Forming the Arepas
Divide the dough into equal parts (around 8 to 10) and form balls using your hands. Then, gently flatten each ball to around a half-inch thickness and shape them into circles, patting them with your palms.
Step 4: Cooking the Arepas
Heat a non-stick pan over medium heat and lightly grease it with an oiled paper towel. Add the arepas to the pan and cook them for around 5-6 minutes on each side or until they become golden brown.
Step 5: Finishing Touches
After being cooked, remove them from heat and let them cool for a few minutes. While still warm, cut them in half as you would a pita pocket or tortilla wrap. You can enjoy them plain or stuffed with any filling you like!
That’s it! Your point arepas are ready to eat! They make great substitutes for tortillas or bread on sandwiches that keep things interesting. Try out different serving variations and share with us your personal favourite twist!
Substitutions and Variations

If you don’t have Arepa flour, don’t let that stop you from making this recipe! Corn flour and Masa Harina are two great substitutes. You can also try making these arepas with whole wheat flour or even cauliflower flour for a gluten-free option.
If you want to switch up the flavor profile, try adding in some spices like garlic powder or cumin. You can also experiment with different types of cheese – I love using queso fresco or mozzarella cheese. For a more indulgent version, why not try stuffing the arepas with your favorite fillings like pulled pork or avocado?
If you’re looking to make smaller portions, try making mini-arepas or even turning them into pupusas or gorditas. Alternatively, you can use these arepas as a base for other dishes like Venezuelan and Colombian-style arepas which are filled with beans, cheese and shredded meat.
Whether you’re trying to make your own tortillas at home, or just want a healthy alternative, there are endless variations and ways to personalize this recipe to suit your taste preferences. Just remember to keep a close eye on the dough’s consistency – it should be moist but not too sticky. So go ahead and get creative!
Serving and Pairing

Once your arepas are perfectly cooked, the possibilities for serving and pairing are endless. Arepas are a versatile ingredient that works well with many different flavors and ingredients. If you’re feeling like a classic Latin American dish, serve your arepas with sliced avocadoes or guacamole, pico de gallo, or a side of refried beans.
For a more American twist, consider filling your arepas with cheese and bacon for a savory treat. You can also try spreading some cream cheese on top of your warm arepa for a creamy texture that won’t disappoint.
If you’re looking for something on the lighter side, consider pairing your arepa with a fresh salad or steamed vegetables. The combination of the hearty arepa and fresh, crispy greens makes for a balanced option that will satisfy without weighing you down.
And don’t forget to enjoy your arepas alongside an icy cold beer or refreshing cocktail. Whether you’re enjoying them at home or at a party with friends, these delicious alternative to tortillas will quickly become one of your favorite go-to dishes.
Make-Ahead, Storing and Reheating
You can make these delicious 1 point Arepas ahead of time and store them in an airtight container for up to 3 days in the refrigerator. Simply reheat them in a toaster or toaster oven until they are warmed through and crispy.
If you’re making a large batch, it’s best to pre-cook the arepas and store them in the fridge or freezer to save time when you’re ready to eat. For storing in the freezer, let them cool completely and then wrap each one in plastic wrap before putting them into a zip-top freezer bag. They will stay fresh for up to 2 months in the freezer.
When you’re ready to reheat, thaw them overnight in the refrigerator if frozen before reheating them as you would when storing in the refrigerator. If reheating from frozen, preheat your oven to 375°F and bake for about 12-15 minutes or until heated through.
Remember, these Arepas are also a great option for meal prep during busy weeks! Just cook them ahead of time and keep them on hand for quick weeknight dinners or lunches on-the-go.
Tips for Perfect Results
If you want to impress your guests or simply want to prepare a delicious meal for yourself, follow these tips to make the perfect Arepas recipe.
Firstly, to achieve the best consistency of the dough, make sure you add just enough water. Start with 1 cup of warm water and slowly add more if necessary. The dough should be smooth and easy to knead, not too wet or dry. Kneading is also crucial, as it will ensure that the dough has the right texture.
Secondly, after kneading the dough, let it rest for at least 5 minutes before shaping it into arepas. This resting period will allow the gluten in the dough to relax, making it easier to handle and shape.
Another important factor is cooking oil. We highly recommend using olive oil for your arepas since it adds flavor without overpowering the natural taste of the dish.
When cooking your arepas on a stovetop grill or griddle, it’s important to heat them slowly over medium heat. Start by placing them on a cold surface and turning up the heat gradually. This method will prevent burning and ensure that they cook properly from the inside out.
For cheese lovers, sprinkling shredded queso fresco or mozzarella cheese on top of your arepas adds a delicious touch. If you’re looking for a low-fat option, try using fat-free milk instead of water when kneading your dough.
Finally, don’t forget about presentation! Arrange your arepas on a platter and garnish them with fresh cilantro or any other fresh herbs you like. It’s the little details that can make all the difference in turning a good arepa into an excellent one.
By following these tips, you’ll be able to make perfect arepas every time – crispy on the outside, soft on the inside with just the right amount of cheese and garnish. Enjoy!
FAQ
Now, let’s take a look at some of the frequently asked questions about this WW 1 Point – Arepas (Alternative to Tortillas) OAMC Recipe. It’s always important to address any concerns or questions that may come up during the cooking process so that everything goes smoothly from start to finish. So, without further ado, let’s get started with these FAQs.
What is the difference between tortillas and arepas?
Arepas are a type of corn tortilla that vary from Mexican tortillas. They require a specific type of cornmeal called masarepa flour, which is pre-cooked, finely textured, and cannot be substituted with other types of cornmeal such as Mexican masa harina.
What flour can I substitute for arepas?
In case you are out of or cannot find masarepa, there’s no need to worry. You can make a substitute by replacing 2 cups of masarepa with a mixture of 1 1/2 cups of masa harina (preferably over cornmeal), 1/4 cup of coconut flour (if not, almond flour can be an option), and 1/4 cup of gluten-free flour or arrowroot starch (alternatively, potato starch can be used).
Can you use harina de maíz to make arepas?
The traditional recipe for Venezuelan arepas calls for just corn flour or harina de maiz, water and salt as ingredients.
Can you use arepa flour to make tortillas?
Although I am familiar with making corn tortillas, I wanted to experiment with arepas and see if I could use the same flour to make tortillas. However, I quickly realized that the arepa flour is unnixtamalized, which means it lacks the necessary treatment to form the same sturdy texture as corn tortillas. As a result, attempting to create tortillas with arepa flour would likely fail as the dough would fall apart when being pressed.
Bottom Line
In conclusion, these WW 1 Point Arepas are the perfect alternative to tortillas for anyone who wants to enjoy a delicious and healthy meal. They are not only easy and affordable to make, but also versatile enough to pair with almost anything you like. By following this recipe, you can make sure that you are using the best ingredients and techniques to get the perfect result.
Whether you want to try making arepas for your next brunch or dinner party, or just want to add some variety to your everyday meals, these arepas are a must-try! With so many variations and substitutions available, there’s something for everyone to enjoy.
So, why not give this recipe a try and see how easy it is to make delicious arepas at home? You won’t regret it! Don’t forget to share your creations with your friends and family so they can also enjoy this tasty and healthy alternative to tortillas. Happy cooking!
Ww 1 Point - Arepas (Alternative to Tortillas) OAMC Recipe
Ingredients
- 2 1/2 cups warm water
- 2 cups arepa flour (masarepa)
- 1 pinch salt
- 1 teaspoon olive oil
Instructions
- Pour water into mixing bowl, stir in arepa flour and salt. Continue stirring until a soft dough forms. Knead gently until the dough feels smooth. Tear off ping-pong-ball-size pieces of the dough and shape them into 3 inch patties, about 1/2 inch thick.
- Heat 1/2 tsp oil in large nonstick skillet over medium heat. Add 6 arepas and cook, turning once, until golden and crusty on the outside, 3-4 minutes per side. Transfer to a heated plate and keep warm; repeat with remaining oil and arepas. Serve at once. Store leftovers in a zip-lock freezer bag in the fridge for up to 3 days or freeze for 1 month.
- 1 point per serving (1 arepa).
- Variations: Try making arepas with warmed fat-free milk instead of water, and when kneading the dough, knead in 1/2 cup shredded fat-free mozzarella cheese. Add 1/2 point.
- To reheat leftovers, wrap them in foil, place on baking sheet and heat at 350F until hot (about 10 minutes). Remove the foil and bake 5 more minutes to crisp. For best results, thaw in refrigerator overnight.
Add Your Own Notes
Nutrition
Recommended Recipes Just For You
None found

Dora
Dora is a chef well-versed in Brazilian and American cuisine. After a hard day's work in the kitchen of her restaurant, she finds the time to jot down recipes for her food blog. Her recipes are sure to delight foodies everywhere, as she strives to make each one unique and enjoyable to read.